
If you ever need to move a Windows Recovery partition, here’s some tools that may be useful.
The normal use-case for moving a Recovery partition is when you have unused disk space ‘beyond’ it, which you want to use to expand an existing partition, for example , see the screenshot below :
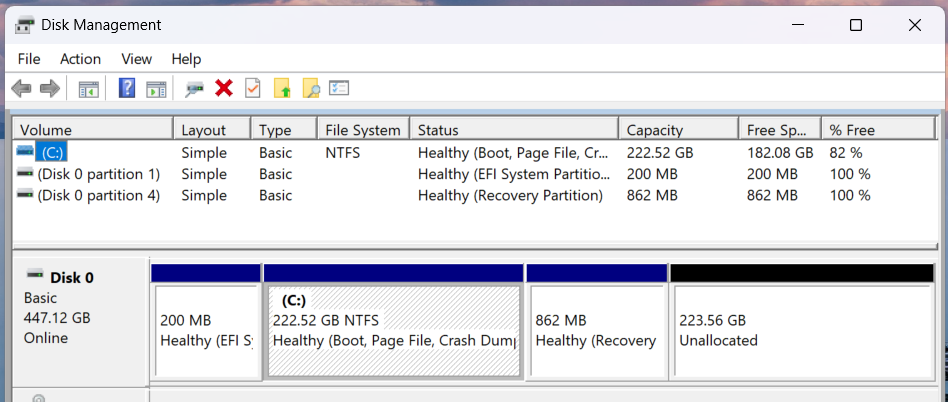
Step 1. Save the contents of the current Recovery partition into the C: drive :
Open an Elevated Command window and double check the location of the current Recovery Environment (RE):
C:> REAGENTC /INFO
You should see that RE is ‘Enabled’, and see the disk partition number (in this case , partition 4 ):
Windows RE status:         Enabled
Windows RE location:       \\?\GLOBALROOT\device\harddisk0\partition4\Recovery\WindowsRE
Now save the Recovery contents :
C:> REAGENTC /DISABLE
( this moves the Winre.WIM Recovery Env file into C:\Windows\system32\Recovery )
Step 2. Use DISKPART to delete the old Recovery partition :
In the same Elevated Command window, start up DISKPART :
C:> DISKPART
- Use
LIST DISKcommand to identify which is the disk where the old Recovery partition is located. If you have multiple disks in your PC, use theDETAIL DISKcommand to double-check you’re choosing the correct disk. - then use the
SEL DISK xcommand to select the correct disk; - then use
LIST PARto show the partitions on that disk :
DISKPART> lis dis

  Disk ###  Status         Size     Free     Dyn  Gpt
  --------  -------------  -------  -------  ---  ---
  Disk 0    Online          447 GB   223 GB        *

DISKPART> sel dis 0

Disk 0 is now the selected disk.

DISKPART> lis par

  Partition ###  Type              Size     Offset
  -------------  ----------------  -------  -------
  Partition 1    System             200 MB  1024 KB
  Partition 2    Reserved            16 MB   201 MB
  Partition 3    Primary            222 GB   217 MB
  Partition 4    Recovery           862 MB   222 GB

DISKPART>
- now use
SEL PAR 4to select the Recovery partition ( this should match the partition number that was shown in the REAGENTC/INFO from Step 1) - the use
DEL PAR OVERRIDEto delete the selected partition
Step 3. Use Windows Disk Management tool to expand your C: partition :
- N.B. make sure you leave at least 500MB free space at the end of the disk : you will use this to create the new Recovery partition.
Step 4. Use DISKPART to create a new Recovery partition : \
DISKPART> sel dis 0
	create par pri (or use Disk Mgmt GUI if you want to specify size etc exactly )
	format quick label=winRE
	set id=de94bba4-06d1-4d40-a16a-bfd50179d6ac
  (or for MBR disks, set id=27 )
  (  LIS PAR should now show par 4 is 'Recovery' type )
  finally,
	gpt attributes=0x8000000000000001
			(i.e  required/protected AND no drive letter to be assigned)
Step 5. Use REAGENTC to move the Recovery Env file into the new Recovery partition : \
C:> REAGENTC /ENABLE
- You should see a success message
REAGENTC.EXE: Operation Successful.